This post does not need a wishy-washy blah blah introduction about crypto trading bots.
We will get straight to the point: This post will give you the exact how-to to set up a trading bot in 10 minutes (or even less).
However, one quick disclaimer: Although it is possible to set up a high-quality trading bot in 10 minutes, you probably shouldn’t do it if you are new to the topic of crypto bots. In this case, educating yourself first and spending 10 minutes as a last step is better.
Okay, essentially, you have to follow five steps.
Step 1 — Open an Account at BloFin (optional, required time: 1 minute)
We directly start with an optional step. Indeed, you need an account at a crypto exchange. The bot we will introduce below can use Binance, Bybit, MEXC, or BloFin.
So, if you already have an account at one of these exchanges, you can directly skip this step (in this case, you only need 9 minutes for the entire process 😉
If you don’t have an account, we suggest opening one at BloFin.
BloFin is one of the fastest-growing and most transparent crypto exchanges. However, more importantly, it is a non-KYC exchange.
That means you can open an account and start trading just with your email address.
Accordingly, you can run through the setup process in 1 minute. Here’s what you need to do:
- Head over to the registration page.
- Enter your email.
- Confirm your email address.
- Done!

Step 2 — Fund Your Account (required time: 2 minutes)
You need to fund your account to enable the bot to execute trades on the exchange.
Therefore, you must fund your account using your credit card or any other available method (depending on the exchange).
Important: Make sure you transfer the funds to the correct account. For example, when using BloFin, the bot will open Future Trades. Accordingly, you need to transfer the funds from your general account to the future accounts after you’ve received them.
If you are unsure which account to choose, check out this page. It lists all available exchanges and related instruments.
Set Up A Trading Bot Step 3 — Get Your API Key (required time: 2 minutes)
Since the idea of a bot is to execute trades on your behalf, you need to grant it access.
To do so, you must create API access keys. Sounds complex but it is super simple.
Here’s an example of how you do it on BloFin (the process at Bybit, Binance, etc. is similar).
Navigate to the API section (you can it under your account menu)

Select to create a new API key and fill in the required information:
- Select API Transaction as key usage
- Check the Trade checkbox
- Enter a name
- Enter a passphrase

As a next step, you have to pass the security verification. Again, the process is different depending on the exchange. At BloFin, you will receive a confirmation email. Binance, on the other hand works with Authenticator.
Important: On some exchanges, you must explicitly enable the pairs you want to trade. Otherwise, your bot will return an error message. It is basically an additional security layer.
Set Up A Crypto Trading Bot Step 4 — Configure Your Bot (5 minutes)
Alright, it’s bot time!
Obviously, there are tons of bots out there.
This how-to focuses on Crypto OS bots. They are straightforward in setting up and provide the highest transparency regarding historical results.
Here’s what you need to do:
Head over to Crypto OS (you can get a bot subscription here if you don’t have one).
Set Up the Basics
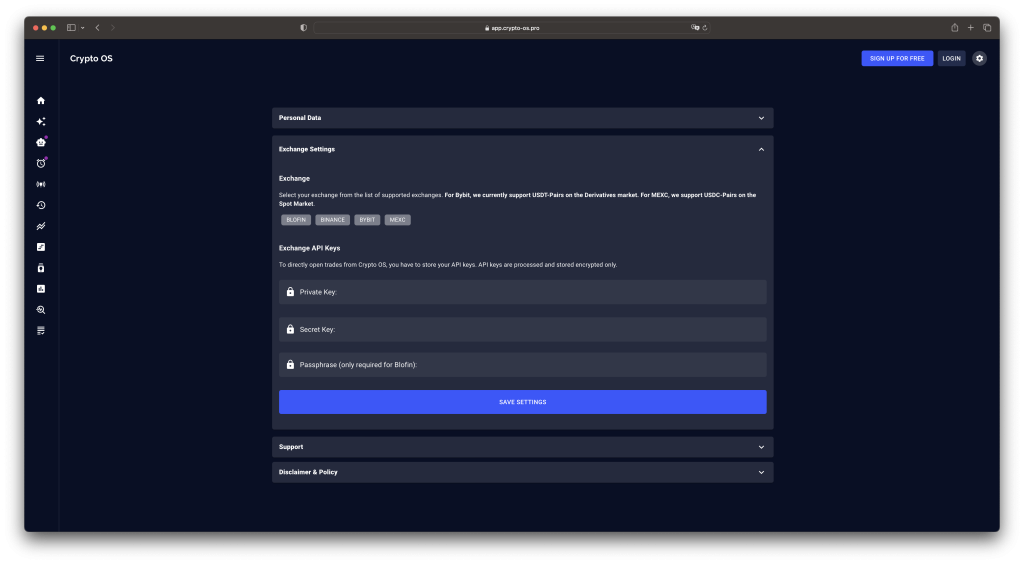
As a first step, you must select your exchange and enter your API keys (and passphrase in the case of BloFin). All key-related data is processed and stored encrypted.
To do this, select the Settings button in the upper right corner and open the “Exchange Settings” tab.

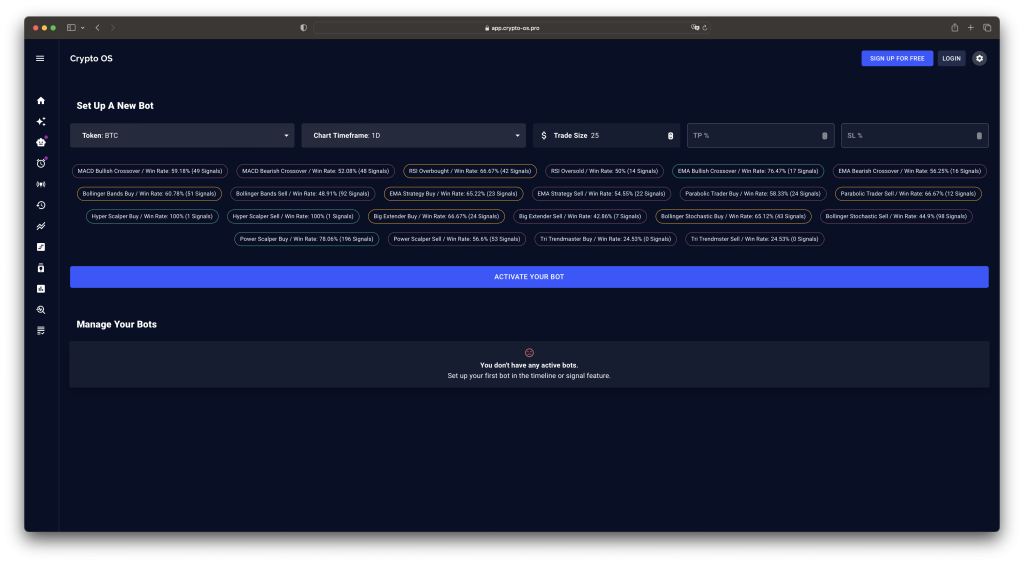
Once this is done, you can head to the Bot Management section and set up your first crypto trading bot!
Got Time — Set Up Your First Crypto Trading Bot
Now, it’s time to make a few decisions.
- First, you must choose the token you want to set up a bot, such as Bitcoin.
- Next, you select the chart timeframe. As a rule of thumb, the higher the timeframe, the fewer signals you get, but the better the quality. Especially if you are getting started, it makes sense to go for the daily chart.
- As a next step, you have to define the trade size. That’s the amount of money your bot deploys with every trade.
- Finally, if your exchange supports it, you can define a stop loss and take profit level.
Alright, we prepared the stage. Your last decision is to choose a trading signal.
For every available trading signal, Crypto OS displays the backtest results and the number of signals processed while backtesting.
Therefore, it’s a good approach to search for signals with a high win rate and a high number of signals since these signals have proven to be reliable.
Regarding Bitcoin on the daily chart, the Power Scalper Buy signal might be a good opportunity. Based on almost 200 signals, it has a 78% win rate.
By the way, if you want to learn more about the signals, you can check out the documentation.

IMPORTANT: The win rate is historical, and the predictive power is limited. Even if you go for a trade signal with a win rate of 100% it is possible that the next 10 trades get lost.
Click “Activate Your Bot” and you are ready to roll.
Sit Back And Relax — The Bot is Taking Care Now!
That’s it. You just set up your first trading bot in probably less than 10 minutes.
Since you’ve activated the bot, it will do all the hard work now.
The bot will scan the chart relentlessly 24/7. Whenever it detects the defined signal, it will open a trade and inform you by email. Awesome.
